Sunday, July 26, 2009

Foyer Framing, Outlooks, and more bracing


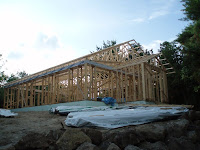
And here we are at the end of 8 days of framing. The foyer has a roof that was hand-cut, or framed on site rather than using pre-manufactured trusses. Still lots to do for the framing inspection but it is really coming together rather quickly.

It's at this juncture that we said good-bye to Jeremy, who had to return to his real life job in Mississauga. He was a pleasure to have around and speaking for all of us, I can say he will be missed. Thank you Jeremy for taking time out of your life to participate in ours. It is truly appreciated!!


The start of the subfascia installation. Man, installing that stuff really pulls it all together. You can definately see where the roof will start and end now and it ties the building together.


The ladders before the subfascia in installed. I did a lot of the cutting of the material for the ladders on both gable ends and the foyer. It wasn't perfect, as our material was delivered in such a way that it sagged in the middle while it sat on the skids, and cutting it released any tension, resulting in wonky boards - a frustration for the framing crew.


Deirdre built the kneewall on the gable end trusses and Jeremy and Justin worked on the foyer framing.

Trusses are up and braced


So here we are with all of the trusses installed and braced externally. Still have to install the permanent bracing as per the truss specifications, but thats for the next weeks schedule.

Deirdre and Justin walking the top plate to assist in the proper placement of the trusses. In three hours all of the trusses were on the ring beam, and by the end of the day were erected. It will be hard to come up with another day in which so much progress with so much visual impact will be made.
We were thankful that day to have not had much involvement. Not a place where you want inexperienced newbies hanging around.

The Dance


Having no experience at material management, this whole process has been a real learning opportunity. First we needed the framing, bracing and strapping material to be here for the roof truss installation. So that material arrived on the Monday.
Tuesday morning our crane operator arrived minutes ahead of the truss company's truck. The trusses were off-loaded onto the driveway and then boomed up onto the roof, 4 or 5 at a time. Jeremy, from our crew, ran the tag-line and things went smoothly.
Perth Planing Mill is our supplier of building materials. So far, they have been very supportive of us newbies. Centennial Truss supplied our trusses, and I must have made a million phone calls to Russ and Mike, ensuring that I have considered everything. Lastly, Greg Coleman was the crane operator, and he was kind enough to come out to the site in advance to ensure he could do the lift. All of these guys showed up when they said they would, contrary to everything that we had been told about the house building industry, so we are considering ourselves to be very fortunate to have found such great companies to deal with.


A few words

We have taken so many pictures of this build that it's hard to select the ones we want to share. They make sense to us, but trying to explain them all would be difficult, so we are picking ones that best illustrate the process.

As we are living in our trailer without power and internet is only available in Perth, loading the daily camera pictures onto the laptop is a project in itself. Building the blog is an after-thought and seems to be the easiest way to share our progress, rather than mass emails. This way, we aren't clogging up your inbox if you don't give a toot, and can either choose to check out the blog or not.

You'll all have to excuse typos as I haven't figured out how to edit posted entries.

We've been two weeks into the actual carpentry aspect of the build. We are completely exhausted as we are not used to so much physical labour. To top it off, we are trying to pack up the homestead in Ottawa, and seem to have lost our steam in that regard. So a few of you might be getting panicked phone calls asking you to come help us pack our underwear. Most of the house is packed, aside from our bedroom, the bathrooms (which have been purged of junk) and some of the kitchen (in case we get the urge to cook).

Our movers are scheduled for August 28th and the stuff goes into storage. We hope to have a garage built at the new place so we can move the garage contents directly to the new garage, as I have a few heavy tools that would be a pain to store and would rather have access to tools and stuff during the construction.

As to where we will live during the build - well we haven't figured that one out yet. It's on the list of things to do. So onward we go.

The Crew

Justin, Deirdre and Jeremy


Jeremy and Justin, the professionals. Andre and I pale compared to these strong able-bodied experienced young men. We are very thankful for their abilities and good-natured temperments. Here they are installing the ring-beam, which is made up of three plys of 2x8" which are glued and nailed together with staggered joints. The building is ringed with this beam, then it's covered with Typar.


Deirdre, the boss. Andre says he has two bosses now, both Deirdre and I, and she is likely kinder to him.

It's not very many projects that will go ahead with the owners being involved in the build, so Andre and I are grateful to this gang for letting us participate. We really feel a connection to this building, and they do too I think. Jeremy commented that he sometimes builds for people who will never even live in the house - that is it is being built for resale, so to have the owners participate is unusual.

Walls Being Erected

Top plates on and lateral bracing holding things in place.


The "methodical" system. Trusses placed, erected and braced as we went along.


The sill plate is PT material with 1.5" EPS foam in between.

Wall Assembly


These are the boys working on the wall assembly. Top Plate material is being ripped on the tablesaw, door and window bucks cut to length on the mitre saw and finally the first section of wall is assembled. The original plan was to build the walls and tilt them into place, much the same as conventional framing, but we soon learned we had too many variables to make that the most efficient option. So rather, the individual trusses were placed, then the door and window openings framed, then the top plate was installed.
There is so little waste on this project that it is worth mentioning. For example each door and window opening was layed out on paper. Window "A" required 1 - 10" 2x6 and 2 - 8' 2x6. From that, the lengths of cuts on each board was predetermined, so all of the material could be cut quickly without having to think about each individual opening's requirements. The resulting off-cuts were minimal. Our site has no dumpster. Small offcuts will be burned, anything else is used elsewhere on the build as blocking.

Framing Day

One of the stacks of completed trusses. We have two sizes, one at 18" wide and all of the ones next to window and door opening are at 15" wide to allow the bales and plaster to curve around them.


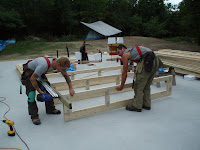
Andre and Justin assembling the "Larsen Trusses". A 2x6 and a 2x4 joined together with 16 nailing plates on a total of 52 trusses equals 852 plates times 10 bashes with the hammer for each plate is 8500 hammer hits of steel on steel. Our neighbors must be loving us now!!


Deirdre had built a jig to aid in the assembly, but it was still a lot of work for one of the crew who was used to office work in his former life. "We've only just begun..."


Deirdre cutting the framing material to length, to build the trusses which will support the roof and hold the bales in place.


The virgin slab. Isn't it a thing of beauty!!

The New Slab is Here, the New Slab is Here!!

Andre arrived at the site at 9:30 am on the scheduled day of the pour and found only one crew member sitting there. Thinking he was waiting for the others to arrive, imagine Andre's surprise when he walked up the hill to find the slab already in. Not wasting any time, the concrete guys had arrived at 7:00 am, and it was done. That was on a Thursday morning, which meant that we could finally start the wall construction the following Monday. Yippie!!

The Waiting Game


Here we are, front access, well drilled and just waiting for the day that the concrete guys would return. If there are no people in these pictures it's because Andre and I would be at the site either before or after work had been completed. All of these stages so far have not been ones that we could be involved directly in.

Water Water Everywhere


Wilf Hall drilled our well. This is the rig after everyone had cleared off due to lightning in the area. Eventually, he was able to return and hit water at 160'. We had a frost protected spigot attached to the well-head so we could have water on site, running the pump off the generator. We have not had the opportunity yet to get the well running, nor the real need, what with all the rain. We are having some surface erosion problems due to the torrential downpours, and are finding our sand fill 100 feet away from where it was placed. Running the well seems far down our list right now, but will jump in importance if heat ever arrives and certainly will be required for the plastering stage of our build. Drinking water is being provided courtesy of a friend in Perth, who lets us hook up to her place to fill all of the water jugs. Water conservation is front of mind. Not a drop is wasted. Dishes are sometimes washed in the potato/pasta water or rain water which has been collected and heated.
Sponge baths, swimming at the beach and showers at the Perth Public Pool have been our options for cleaning up at the end of day. $2.00 admittance for unlimited hot water and soap is especially nice. How ironic with all the rain. I keep thinking I will build a solar shower, but have not had the time nor the sun to motivate me.

Radiant Heat and More Site Work

While the plumbing crew laid the pipe, the excavator was hard at it, getting us access up the hill to the house. We would need a way to get material and bodies up to the house, so a wall was built using some of the rock which was excavated for the house and septic tanks. Jeff Blackburn is an "artiste" and stacked the rock in a somewhat natural way, then gave us a gangway up on the one side. We used the existing features of the property to bank up against. More work will need to be done after the house is complete.


PEX tubing was laid and pressurizsd to 25 psi, then the slab could have been poured. Here is where we had a slight delay in the proceedings. 9 straight days of rain meant no concrete for us!! The only consolation was everyone else building was likely in the same boat, if that was any comfort at all. When you are in it, it feels like you are the only one experiencing these things.


4" of EPS Foam was laid down as the slab insulation, to prepare for the radiant tubes. Then the concrete installer laid the welded wire mesh and the tubes get tie-wrapped to it. We purchased recycled foam fdirect through a company that supplies the SIP industry, so saved a little dough there.


Saturday, July 25, 2009

Plumbing services

Nearly ready, but then we had to soak it down to really compact it. 2000 gallons of water was added. It was during the only really hot days of the summer so far, so a slight relief for the plumbing crew.


Electrical service, water supply, etc. before the last of the fill and compaction.


Piping for the drains, septic and electrical were all laid before the fill started.

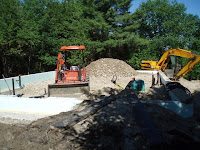
The never-ending backfill

A pile of fill yet to be deposited into the black hole of the foundation.


Fill and compact. Fill and compact. It would eventually have to end right?? Our site-work company was Blackburn Excavating. Bruce Blackburn and his son Jeff were very contientious.


Just a little of the fill material.
Finally, it was levelled off and ready for the 4" of foam, the radiant tubes and then the concrete slab. Yeah!!


Relief


We think they placed the toilet facilities a little close to our sleeping and eating accomodations. Thankfully, we were able to convince the company of same and the toilet was relocated much closer to the public road. Now we get to wave at the locals passing by. We are certain to be making great impressions!!

Footing and forms

Stepped footings were installed due to the change in elevation between the front and the back of the house. We knew there was a change, but it certainly did not appear to be as big visually as it really was. We were disheartened to learn that we would be spending a few pennies on back-fill, as this was a slab-on-grade foundation, and something would have to go into the big hole.


The ICF (insulated concrete forms being installed by Saturn Concrete of Smiths Falls. Allan Murray and his crew did amazing work. They would just show up, do what needed be, and then leave with the breeze. Can't say enough good stuff about the work.


The robotic concrete pump filled the forms directly from the concrete trucks which were parked below the site.


Septic and excavation work


The baby excavator starting to dig for the septic tanks which was the 1st big bit of site-work taken on. (Aside from the construction roadway which was built to get the equipment up the hill onto the rock.)


The bigger rock breaker, which was on-site for a day and a half. We had to crack solid granite for allow for footings for the foundation. All was well until the last pass and equipment failure forced the operator to wait for the heavy duty mechanics to arrive. The other equipment was forced to go under its arm.


Looking over the septic tank excavation. We chose to use the peat-moss based Eco-Flo system, ttp://http://www.ecofloontario.com which requires a smaller foot-print for the tanks and bed. This was the scene with the broken down high-hoe, the smaller excavator, and the flatbed with the septic tanks on board. A tight fit.


This is the home away from home for the duration of the build and possibly longer, seeing as we have sold our home here in Ottawa and will be moving out in another month. It's a 1974 Travelaire Trailer that Andre bought last fall while I was in Alberta. The bed is 39" wide and doesn't feel much longer and that's the biggest bed!!

It has begun


Well, here we are 25 days into our build and things are finally starting to take shape. The first few weeks were filled with site-work and rain, which is not a combination we would recommend. And finally after 9 days of straight rain, our slab was able to be poured and framing work could begin.


To back up a bit, Andre and I never considered building a house. We had been poking around looking for something to buy and relocate to for our retirement years, but never found what we were looking for. Then we found this interesting piece of land. 4 acres of mixed forest and Canadian Shield on a paved road that had never been developed. Guess no-one else was crazy enough to consider the location. My dream was always for an alternative house, away from the road and I guess after several years I wore him down. So now we are building a straw-bale house. There will be no basement, as we are building on a rock, and did not want to have to blast.


This will be the first house built - that we are aware of - using the method we are. Our builder is Deirdre McGahern of Straworks. http://straworks.ca/ With her guidance and support, and using her method, I designed our house to be south facing for maximum solar gain, with smaller windows on the north face, and the doors and windows are oriented to be across from each other for cross-breeze ventilation in the summer. I then drafted all of the blue-prints in order for us to receive building permits for both the house and the garage. The roof will be steel with 30"+ overhangs to shade us in the summer and allow the sun to reach the concrete slab floor in the winter. Radiant in-floor heating will provide winter warmth. We still have not decided if we will have a wood-stove.


Bales provide about R35 in the walls. Interior and exterior walls are plastered. Partition walls will be typical drywall. We have a cathedral ceiling on the common area side of the house where the kitchen and living rooms are. We will require no air conditioning in summer due to the mass of the walls which will be about 20" thick and the house will be warm and snug in the winter.


The unique construction involves using "Larsen Trusses" as the structural support members. They are site-built to engineers specs. and spaced 36" apart and are 18" deep. The straw bales will sit between these members, so no stitching of the bales and mesh required.